How to Tension a Belt: Exact Methods for Peak Drive Performance
11 min
- Why Belt Tensioning Determines Drive System Reliability
- What Belt Tensioning Actually Involves
- Preparation Steps Before Tensioning Any Belt
- How to Tension a Belt Using the Force-Deflection Method
- How to Tension a Belt Using the Frequency Method
- Belt Tensioning Methods: When to Apply Each Approach
- Common Belt Tensioning Mistakes and Their Consequences
- Best Practices for Extending Belt and Drive Component Life
- Mastering Belt Tensioning: From Procedure to Competence
- JLCMC Belts: Engineered for Consistent Tension Retention and Drive Efficiency
- Frequently Asked Questions
Belt tensioning is the single variable that determines whether a power transmission system operates efficiently or consumes itself from the inside out. Get it wrong, and the damage extends far beyond the belt itself—bearings overload, pulleys wear unevenly, and shaft seals begin leaking. There is no warning siren before a belt snaps; the first indication of trouble is often slippage under load or the acrid smell of overheated rubber. By that point, the failure has already propagated through the drive system.
Why Belt Tensioning Determines Drive System Reliability
A belt transmits power through friction or positive engagement, depending on its construction. In either case, tension is the controlling variable.
V-Belt (Vee-Belt) Tensioning
For V-belts, which rely on wedge friction within pulley grooves, insufficient tension eliminates the clamping force required to transmit torque. The belt slips, heat builds at the interface, and the rubber compound degrades. Excessive tension, conversely, loads the shaft bearings beyond their rated capacity, accelerates fatigue in the belt's tensile cords, and increases parasitic drag that wastes energy.
Timing Belt Tensioning
For synchronous (timing) belts, the mechanism differs, but the sensitivity to tension remains. These belts operate through positive tooth engagement with sprocket grooves. Too little tension allows tooth jumping under shock loads. Too much tension strains the fiberglass or aramid cords and imposes radial loads on the sprocket bearings that exceed design limits.
The operational window between under-tensioning and over-tensioning is narrower than most maintenance teams assume. This is why guesswork—pressing a thumb against the belt span and declaring it "tight enough"—is a practice that belongs to an earlier era of maintenance. Modern drive systems demand quantified tension values.
What Belt Tensioning Actually Involves
Belt tensioning is the process of applying a calculated static preload to a belt drive so that, under operating conditions, the belt maintains sufficient contact force with the pulley or sprocket surfaces to transmit the required power without slipping or skipping.
The critical detail that is frequently overlooked: belts are not static components. A new belt undergoes initial stretch during the first 24 to 72 hours of operation as the tensile cords seat and the elastomeric backing compresses. The tension measured at installation will drop measurably after this run-in period. A belt that was tensioned to specification on Monday may be under-tensioned by Wednesday if no follow-up check is performed.
This dynamic behavior is why tensioning procedures specify different values for new belts versus used belts. New belts require higher initial tension—typically 20–30% above the nominal operating value—to compensate for this initial elongation.
Preparation Steps Before Tensioning Any Belt
Skipping preparation is the most common source of tensioning errors. The following steps must be completed before any adjustment is made:
- Lock out and tag out the power source: Mechanical energy stored in rotating masses can restart equipment unexpectedly. Verify zero energy state at the breaker, not just the control switch.
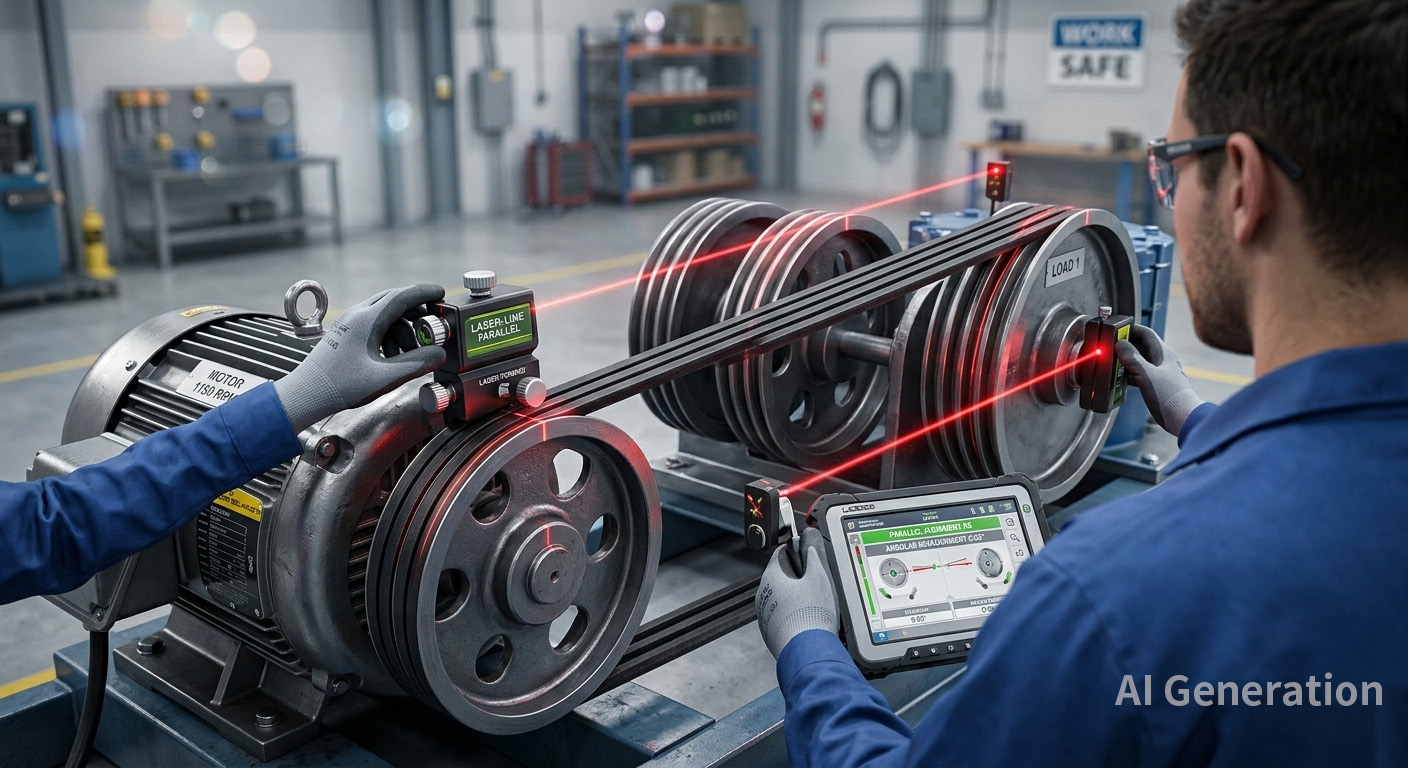
- Inspect pulley or sprocket alignment: Misalignment is the primary cause of premature belt failure, independent of tension. Use a straightedge across pulley faces for a quick check, or a laser alignment tool for precision. Angular and parallel misalignment both concentrate load on one edge of the belt, causing asymmetric wear.
- Inspect the belt and pulley condition: Look for glazing (a hardened, shiny surface indicating heat damage from previous slippage), cracking at the tooth roots on timing belts, or fraying and cord exposure on V-belts. Also, inspect pulley grooves for wear—worn grooves reduce the wedge contact area and alter the effective tension requirement.
- Gather specifications: Record the belt type, section size, span length, and manufacturer-recommended tension range. These values are not interchangeable between belt constructions.
- Select the appropriate measurement method: V-belts are commonly measured by deflection or frequency. Timing belts are more accurately measured by frequency due to their lower compliance and higher stiffness.
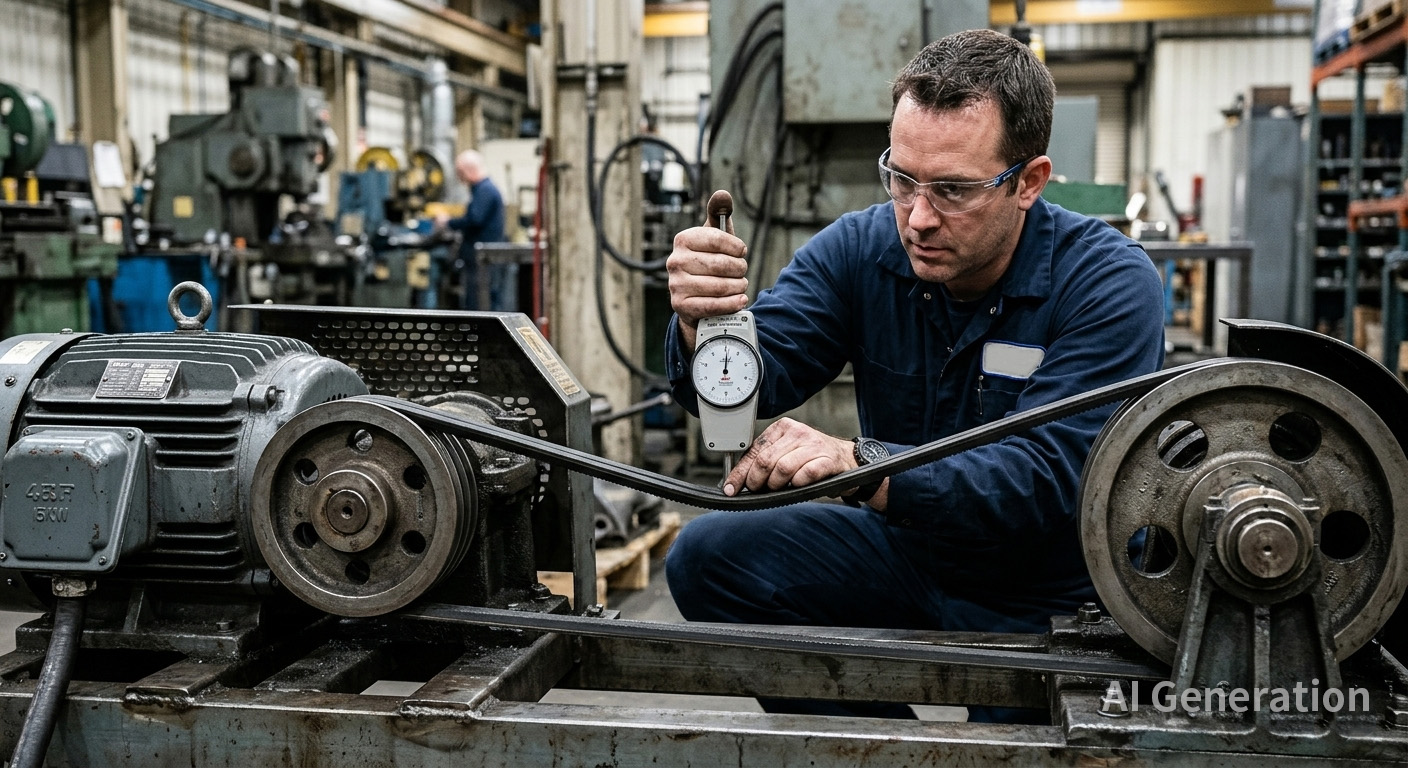
How to Tension a Belt Using the Force-Deflection Method
The force-deflection method is the most widely applied technique for V-belt drives in industrial maintenance. It requires no electronic instrumentation and can be performed with a tension gauge or spring scale.
The procedure is as follows:
- Measure the span length (L) between pulley centers along the belt path.
- Calculate the target deflection: 1/64 inch of deflection for every inch of span length. For example, a 32-inch span requires 1/2 inch of deflection.
- Position the tension gauge at the center of the span and apply a perpendicular force until the belt deflects to the calculated distance.
- Read the force value from the gauge. Compare this to the manufacturer's recommended force range for the specific belt section and pulley diameter.
- Adjust the center distance or tensioner position until the measured force falls within the recommended range.
- For banded (multi-rib) belts, multiply the table force value by the number of ribs in the band.
- Run the drive for 5–10 minutes to seat the belt, then recheck and readjust tension.
| Belt Section | Typical Force Range (lbf) | Deflection per Inch of Span |
| SPZ | 33–79 | 1/64″ |
| SPA | 45–112 | 1/64″ |
| SPB | 67–157 | 1/64″ |
| SPC | 112–270 | 1/64″ |
Values are per single belt; multiply by rib count for banded belts.
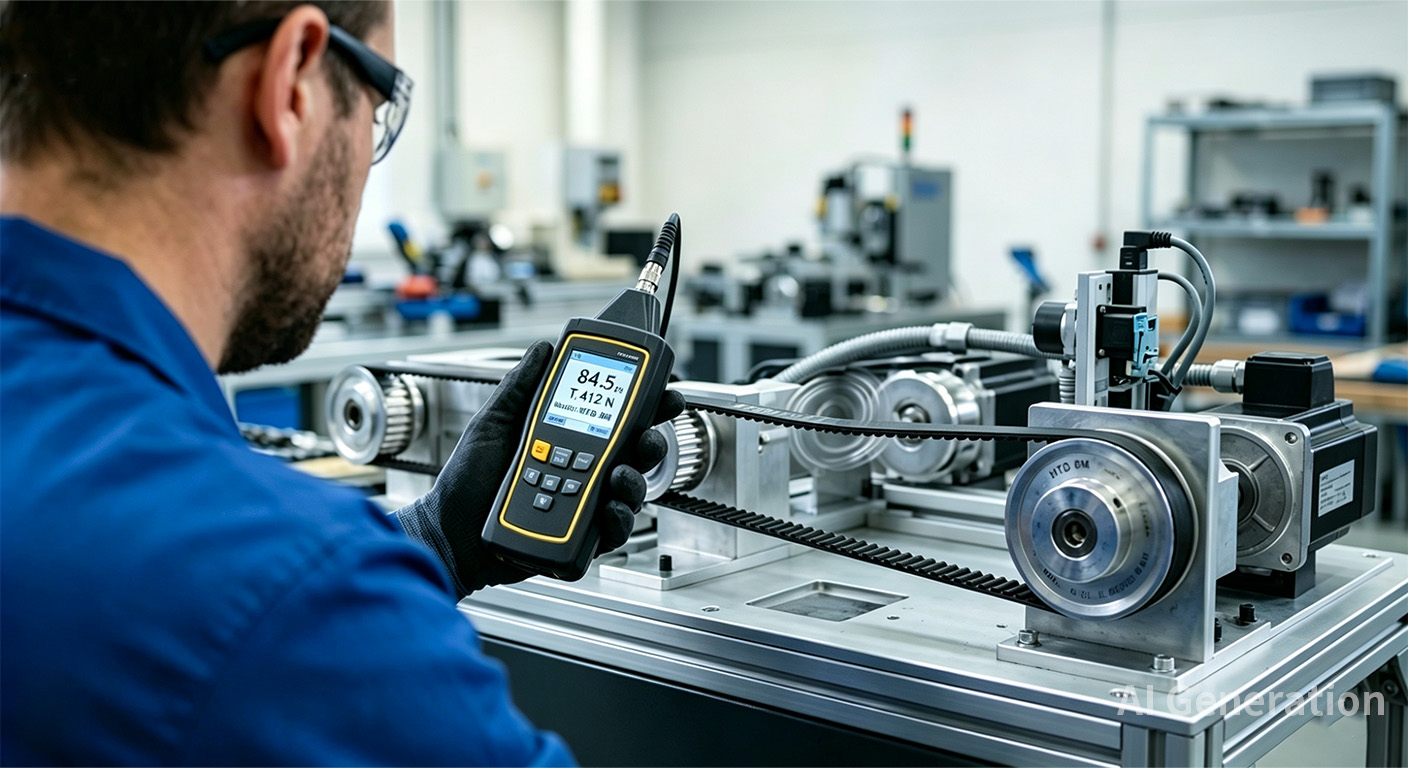
How to Tension a Belt Using the Frequency Method
For timing belts and high-precision V-belt applications, the frequency method provides superior accuracy and repeatability. This method exploits the physical relationship between a vibrating belt's natural frequency and its static tension.
The governing relationship is:
T = 4 × m × L² × f²
Where T is tension (N), m is belt mass per unit length (kg/m), L is free span length (m), and f is measured natural frequency (Hz).
The procedure:
- Enter belt parameters into the frequency meter: mass per unit length, span length, and belt width. These values are provided in the manufacturer's datasheet.
- Pluck or tap the belt span lightly to induce vibration perpendicular to the belt length.
- Hold the sensor within approximately 25 mm (1 inch) of the belt span and trigger the measurement.
- Compare the reading to the calculated target frequency range. Higher frequency indicates higher tension; lower frequency indicates insufficient tension.
- Adjust and remeasure until the frequency falls within specification.
- Take three successive readings and verify consistency. Variation exceeding 10% suggests measurement error or non-uniform tension distribution.
Frequency measurement is particularly valuable for timing belts because their steel or fiberglass cords exhibit minimal stretch under deflection, making the force-deflection method less reliable.
Belt Tensioning Methods: When to Apply Each Approach
Three mechanical approaches exist for applying and maintaining tension, and the correct selection depends on the drive geometry and constraints:
| Method | Description | Best Application |
| Center Distance Adjustment | Motor mounted on sliding base; position adjusted to increase span | Most industrial drives with accessible motor mounts |
| Inner Tensioning | Tensioner pulley installed inside the belt loop, contacting the tooth side or the inner span | Fixed-center drives where the motor cannot be moved |
| Outer Tensioning | Tensioner pulley contacts the back side of the belt, outside the loop | Compact machinery, fixed-center automotive applications |
Center distance adjustment provides the most stable and uniform tension because it does not introduce additional rotating elements. Inner tensioning is effective but requires careful positioning to avoid interfering with tooth engagement on timing belts. Outer tensioning is the easiest to retrofit but applies load to the belt's non-toothed surface, which is acceptable for V-belts but less ideal for timing belts.
Common Belt Tensioning Mistakes and Their Consequences
The following errors are observed regularly in field maintenance, and each carries specific mechanical consequences:
- Over-tensioning: Applied by technicians who fear slippage more than bearing failure. Excessive tension increases bearing radial loads, accelerates seal wear, stretches cord past elastic limits, and raises operating temperature. The belt does not slip, but everything else degrades faster.
- Under-tensioning: Results in slip at startup (audible as squeal), especially in direct-on-line motor starts without variable frequency drives. Slip generates frictional heat that hardens the rubber compound and causes surface glazing.
- Single-point tensioning on multi-belt drives: Measuring one belt and assuming the others match. Belt sets stretch at different rates; each belt must be measured individually, and the readings averaged.
- Neglecting post-installation re-tensioning: Installing a new belt to specification and never checking it again after the run-in period. Initial stretch drops tension below the minimum within days.
- Ignoring manufacturer specifications: Applying generic tension values regardless of belt construction, section size, or pulley diameter. Each belt design has a specific tension window optimized for its cord type and rubber compound.
Best Practices for Extending Belt and Drive Component Life
Optimal belt life is achieved at the lowest tension that prevents slip under peak load conditions—not the highest tension that feels secure.
Additional practices that directly impact service life:
- Re-tension after 24–48 hours of operation on any new belt installation. This is non-negotiable.
- Inspect tension every 3–6 months under normal duty cycles; more frequently for continuous-duty or high-shock applications.
- Keep belts and pulleys free of oil, grease, and debris. Petroleum products soften rubber compounds and reduce friction coefficients. On timing belts, contamination can mask true tension readings by altering the belt's effective mass.
- Replace belts in matched sets. Mixing new and worn belts in a multi-belt drive guarantees uneven load distribution and premature failure of the new belts.
- Document tension values and inspection dates. Tracking trends reveals whether a drive is drifting out of specification due to bearing wear, structural flexure, or belt degradation.
Mastering Belt Tensioning: From Procedure to Competence
Competence in belt tensioning is not about memorizing a single method. It is about understanding which method applies to which belt type, recognizing that tension is a dynamic property rather than a one-time setting, and maintaining the discipline to verify and re-verify after installation.
The force-deflection method remains the practical standard for most V-belt maintenance. The frequency method provides the precision required for timing belts and critical-speed applications. Both methods fail if the underlying preparation—alignment inspection, component condition assessment, and specification verification—is abbreviated or skipped.
A well-tensioned belt drive runs quietly, transmits power efficiently, and reaches its design service life. A poorly tensioned drive consumes itself and the surrounding machine structure. The difference is measurable, repeatable, and entirely within the control of the maintenance technician.
JLCMC Belts: Engineered for Consistent Tension Retention and Drive Efficiency
JLCMC engineers belt drive components with the understanding that proper tensioning begins with the belt itself. JLCMC timing belts, V-belts, and specialty drive belts are manufactured with consistent cord tension and durable rubber compounds that resist the stretching and heat degradation that lead to tension loss in the field.
For operations where unplanned downtime carries significant cost, JLCMC belts provide the dimensional stability and material consistency that allow maintenance teams to set tension once and maintain it through the service interval. JLCMC's engineering focus is on delivering drive components that hold their specification under load, temperature variation, and extended operation—reducing the frequency of re-tensioning and extending the overall maintenance cycle.
Frequently Asked Questions
How tight should a drive belt be?
The correct tension is the lowest value that prevents slippage at peak load. For V-belts measured by deflection, this is typically 1/64 inch of deflection per inch of span length when measured with a calibrated tension gauge. Timing belts require frequency-based measurement for accuracy due to their higher stiffness.
How do I know if my belt tension is incorrect?
Under-tensioned belts squeal on startup, slip under load, and exhibit glazing or hardening on contact surfaces. Over-tensioned belts generate excessive bearing heat, cause premature bearing failure, and show visible cord stretch or edge wear.
How often should belt tension be checked?
New installations require re-tensioning after 24–72 hours of operation to compensate for initial stretch. After run-in, inspect tension every 3–6 months under normal conditions, or more frequently for continuous-duty and high-shock applications.
Can a removed belt be reinstalled and retensioned?
Only if the belt shows no cracking, fraying, cord damage, or glazing. Even then, a used belt has already undergone initial stretch and will not tension identically to a new belt. When reliability is critical, replacement is the conservative choice.
Why do new belts require higher initial tension?
New belts contain tensile cords that have not yet seated within the elastomeric matrix and pulley grooves. During the first hours of operation, this seating process causes measurable elongation. The higher initial tension ensures the belt remains within specification after this settlement occurs.
Keep Learning
How to Identify V Belts and Their Types to Improve Factory Automation Efficiency
What Is a V-Belt? A V-belt is a flexible power transmission belt with a trapezoidal (V-shaped) cross-section. It transmits torque through the friction generated between the belt’s sidewalls and the grooves of a pulley. Typically constructed from rubber compounds reinforced with fiber or steel cords, V-belts combine strength with flexibility. They are designed to improve transmission efficiency, reduce slippage, and dampen vibration and noise. As a result, V-belts are widely used in applications such a......
How to Tension a Belt: Exact Methods for Peak Drive Performance
Belt tensioning is the single variable that determines whether a power transmission system operates efficiently or consumes itself from the inside out. Get it wrong, and the damage extends far beyond the belt itself—bearings overload, pulleys wear unevenly, and shaft seals begin leaking. There is no warning siren before a belt snaps; the first indication of trouble is often slippage under load or the acrid smell of overheated rubber. By that point, the failure has already propagated through the drive ......
Types of Conveyor Belt in Warehouse Operations Across Industries
A few years ago, I walked through a mid-sized distribution center in the Midwest that had just finished its first automation retrofit. What struck me wasn't the robotics or the software dashboards—it was the conveyor belt. Hundreds of meters of it, running at different speeds, handling everything from fasteners to equipment hardware, all while the floor manager tracked throughput on a tablet. That single piece of equipment, often overlooked, turned out to be the backbone of the entire operation. Conve......
V-Belt Measurement for Accurate Sizing and Replacement
A V-belt is a power transmission belt with a V-shaped cross-section that efficiently transmits motion between pulleys through wedging friction. How to Measure a V-Belt (Vee Belt) Beginners often make several common mistakes when measuring V-belt size, such as estimating length by folding the belt, using a simple ruler for approximate measurement, ignoring the belt cross-section, or measuring the belt in a slack condition. These are incorrect practices and can lead to improper belt selection or even da......
Best Conveyor Belt Materials & Their Uses
Conveyor belts are the backbone of modern manufacturing and distribution, silently driving efficiency across countless operations. But their performance isn't just about motors or pulleys—it hinges on one critical factor: the material used for conveyor belt construction. Choosing the wrong conveyor belt material can quickly lead to operational headaches—premature wear, product damage, contamination risks, and soaring maintenance costs. A conveyor belt works under constant stress. It bends around pulle......
Conveyor Belt Dimensions and Practical Guidelines for Effective Replacements
The conversations usually start the same way. A client reaches out because a conveyor belt needs replacing. The old one wore out too quickly, or it started drifting, or throughput never quite matched expectations. They're not redesigning the system—they just want a "same spec" replacement. And that's where things tend to go wrong. Because in many of these cases, the original conveyor belt dimensions were never fully aligned with how the system actually operates today. Replacement projects expose what ......