How to Remove a Stripped Torx Screw
7 min
- Diagnose the Problem Before Applying More Force
- Tools and Safety Precautions
- Removal Methods from Lowest to Highest Risk
- What to Do After the Head Releases
- How to Prevent Stripping Torx Screws
- FAQ
- Conclusion
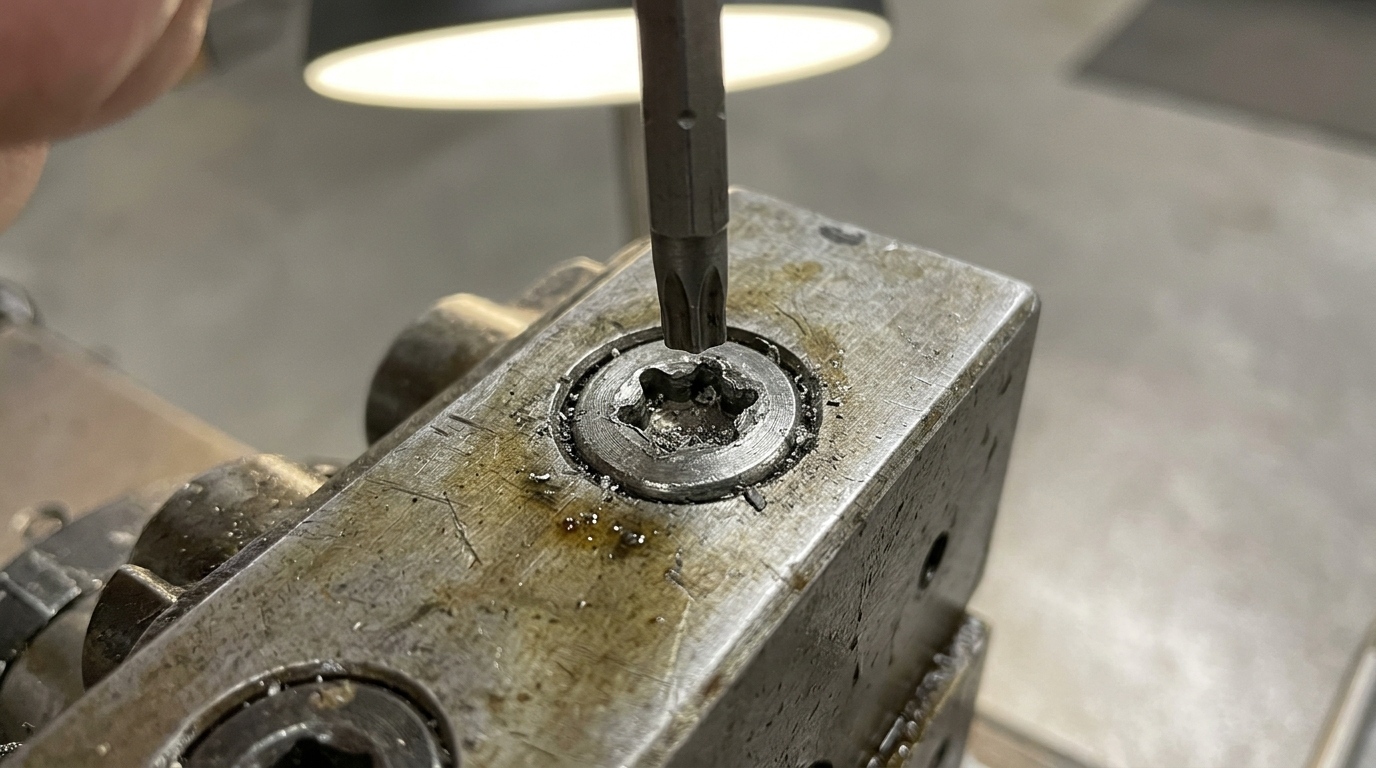
A stripped Torx screw has a damaged star-shaped recess. Your bit slips, turns inside the head, or fails to grip. Do not start with more force. Extra force often damages the recess further.
People removing stripped Torx screws should start with the simplest method first. Clean the recess. Check the bit size. Add steady downward pressure. Move to extraction tools only when basic steps fail.
Diagnose the Problem Before Applying More Force
A damaged screw head is only one possible problem.
Before removing a Torx screw, find out why the screw refuses to move. The cause changes your next step.
Damaged recess, seized threads, threadlocker, corrosion, or wrong bit
Check for these issues first:
- Damaged recess: The star-shaped edges look worn, rounded, or chipped.
- Wrong bit size: The bit feels loose or slips when you turn it.
- Dirt or paint: Buildup inside the head stops the bit from sitting fully in place.
- Corrosion: Rust around the threads makes the screw harder to turn.
- Threadlocker: Some screws have threadlocker on the threads, which adds resistance.
- Seized threads: Rust, dirt, or damaged threads stop the screw from moving freely.
A Torx screw head stripped by repeated tool slip often shows rounded edges inside the recess.
People often type remove Torx screw stripped when the real problem comes from a poor bit fit. Check the bit before trying another method.
Standard Torx vs pin-in tamper-resistant drive
Standard Torx screws have a six-lobe recess. Tamper-resistant Torx screws add a small pin in the center. You need a matching security Torx bit with a hole in the tip.
Look closely before applying torque. Using a standard Torx bit on a pin-in screw gives poor contact and damages the drive.
Tools and Safety Precautions
Start with basic tools. Move to cutting or drilling only when safer options fail.
Useful tools include:
- Correct Torx bits.
- Manual screwdriver or bit holder.
- Small brush or pick for cleaning.
- Extraction pliers.
- Screw extractor.
- Left-hand drill bit.
- Masking tape.
- Eye protection.
Protect the area around the screw before you work. Cover painted surfaces with masking tape. Keep metal chips away from circuit boards, bearings, connectors, and other precision parts. Wear eye protection when drilling or cutting.
A Torx screw stripped head repair becomes harder once cutting damages the surrounding part, so protect the work area first.
Removal Methods from Lowest to Highest Risk
Use the lowest-risk method first. Stop when one method starts to damage the part. For people asking how to unscrew a stripped Torx screw, this order reduces unnecessary damage.
Clean the recess and confirm the exact bit size
Start by cleaning the drive recess.
Remove:
- Dirt.
- Paint.
- Grease.
- Rust flakes.
- Loose metal.
Push the Torx bit fully into the head. Identify the correct Torx size based on the screw specifications or a known-good fit. Do not choose a smaller bit simply because the correct bit feels tight.
The right bit should sit deep in the recess with little side movement. For how to remove stripped Torx screw problems, this simple check often saves the screw from further damage.
Add downward pressure and controlled manual torque
Place the correct bit straight into the screw. Push down firmly while turning slowly. Use a manual driver first. Manual torque gives you more control than a fast power tool.
Keep the driver straight. A tilted bit contacts fewer parts of the Torx recess and increases slipping. Stop if the bit starts cutting more material from the head.
Grip an exposed head with extraction pliers
If the screw head sits above the surface, grip the outside edge instead of using the damaged recess. Extraction pliers have jaws made to bite into screw heads.
Grip the head firmly and turn in the loosening direction. This method works best when enough of the head rises above the surface for the jaws to hold. People asking how to get out a stripped Torx screw should check for exposed head access before drilling.
Use a purpose-made extractor or left-hand drill bit
Use an extractor when the drive recess no longer gives useful grip. A screw extractor bites into a damaged screw and turns the fastener out.
A left-hand drill bit turns in the loosening direction while drilling. In some cases, the drilling force starts turning the screw before you need an extractor. Keep the tool centered. Protect the surrounding surface.
For people asking how to remove Torx screw that is stripped, an extractor makes more sense after simpler methods fail.
Cut a slot or drill the head only when access and risk allow
Treat cutting and drilling as last options. If the screw head has enough space around the top, a shallow straight slot gives a flat screwdriver a new drive surface.
Keep the slot centered and avoid cutting into the surrounding part. Drilling the screw head removes the clamping force from the joint. After the head separates, you remove the part and work on the remaining screw shaft.
Avoid this approach around sensitive electronics or valuable parts unless you know how to protect them from metal chips and tool damage.
What to Do After the Head Releases
Do not stop after the head comes free. Check the screw shaft and female thread.
Remove the remaining stud and inspect or repair the female thread
If part of the screw remains above the surface, grip the exposed shaft with pliers and turn slowly. Then inspect the threaded hole.
Look for:
- Damaged threads.
- Rust.
- Dirt.
- Metal chips.
- Old threadlocker.
- Cross-threading.
Inspect the female threads for damage before installing a new screw. Clean the hole and repair or replace the threaded component if the threads are damaged. Replace the damaged fastener. Do not reinstall a screw with a worn Torx recess.
How to Prevent Stripping Torx Screws
Most stripped Torx heads start with poor tool fit or poor tool angle.
Use these habits:
- Match the exact Torx size.
- Clean dirty recesses before inserting the bit.
- Push the bit fully into the head.
- Keep the driver straight.
- Apply steady downward pressure.
- Stop when the bit starts slipping.
- Replace worn bits.
- Start threads by hand where possible.
- Avoid excessive tightening.
- Check torque requirements on sensitive assemblies.
People often damage small screws because they use too much force too early. Good bit fit matters more than extra force.
FAQ
Can a larger Torx bit be tapped into the recess?
A slightly larger bit sometimes grips a badly worn recess, but forcing one in risks cracking the head or damaging the surrounding part. Try proper extraction tools first.
How do you remove a small Torx screw in electronics?
Disconnect power, use the exact bit size, protect nearby parts, and work by hand first. Avoid drilling near boards, batteries, or small connectors unless a repair specialist handles the work.
When should you stop and use a repair service?
Stop when the screw sits near fragile electronics, the head breaks, drilling risks the part, or the screw refuses to move after safe extraction methods.
Conclusion
A stripped Torx screw does not mean you should start drilling. Start by cleaning the recess and checking the bit. Add controlled downward pressure. Grip an exposed head when possible. Move to an extractor only after lower-risk methods fail.
If you searched how to remove a stripped Torx screw, focus on protecting the part around the fastener as much as removing the screw itself. To help prevent future stripping, explore JLCMC's precision Torx screws to find the right tools and replacement screws for your next repair.
Popular Articles
Keep Learning
Indexing Plunger Selection Guide: Engagement Depth, Reset Mechanism, and Load Paths
Key Takeaways Reset behavior and retention in the retracted position describe operation, not the pin's load capacity. Confirm engagement at the receiving feature rather than relying only on the knob position. Check the minimum available straight engagement after mounting gaps and lead-in geometry are included. Spring force acts along the pin; transverse holding loads also involve the pin, guide, mounting structure and receiving hole. Reduce unnecessary unsupported distance and assess bending where the......
How to Remove a Stripped Hex Socket Screw (Allen Screw)
A stripped Allen screw becomes hard to remove when the hex key no longer grips the socket. The recess might have rounded edges, or rust might hold the thread in place. Before you use force, check what part has damage. The right method depends on whether the problem sits in the socket or deeper in the thread. If you want to remove a stripped hex screw, start with the least harsh method. Clean the socket and test the exact key size first. Move to pliers or an extractor only if simple methods fail. A slo......
How to Remove a Stripped Torx Screw
A stripped Torx screw has a damaged star-shaped recess. Your bit slips, turns inside the head, or fails to grip. Do not start with more force. Extra force often damages the recess further. People removing stripped Torx screws should start with the simplest method first. Clean the recess. Check the bit size. Add steady downward pressure. Move to extraction tools only when basic steps fail. Diagnose the Problem Before Applying More Force A damaged screw head is only one possible problem. Before removing......
What Is a Hex Screw? Hex-Head and Hex-Socket Fasteners Explained
If you ask what is a hex screw, the answer depends on the type of drive. Some people use the term for a screw with an outer six-sided head. Others use it for a screw with a six-sided recess inside the head. Both forms use a hex shape, but the tool sits in a different place. An external hex head works with a wrench or socket. An internal hex socket works with a hex key, also called an Allen key. The right term depends on the fastener standard and the product name used by the maker. Hex Screw Definition......
Understanding Different Types of Hex-Head Screws
Hex socket screws use a six-sided recess inside the head. You turn them with a hex key or hex bit. The basic drive stays similar across the range, but the head shape and screw form change from one type to another. These differences affect head clearance, surface contact, and the role of the screw in the joint. People often group all hex screw types under one name. A socket head cap screw does not serve the same role as a set screw or shoulder screw. You should check the head profile and thread layout ......
Types of Hex Bolts and How to Choose Them
Hex bolts have a six-sided head that fits a wrench or socket. People use them in many joints because the head gives the tool broad contact and easy access. The main differences come from thread length, thread pitch, head form, material, and finish. The types of hex bolts also vary by standard and job. A partially threaded bolt suits one kind of joint, while a fully threaded hexagon-head screw suits another. You should look at the full joint before you choose a fastener. Hex Bolt Types at a Glance The ......