Blind Rivet Nut Guide: Types, Installation, Uses and Selection
23 min
- 1. What Is a Blind Rivet Nut?
- 2. How Does a Blind Rivet Nut Work?
- 3. Blind Rivet Nut vs Blind Rivet
- 4. Blind Rivet Nut Types
- 5. Blind Rivet Nut Materials
- 6. Thread Size, Hole Size and Grip Range
- 7. How to Choose a Blind Rivet Nut
- 8. How to Install a Blind Rivet Nut
- 9. Applications in Mechatronic and Sheet-Metal Assemblies
- 10. Common Blind Rivet Nut Problems
- 11. Removing a Blind Rivet Nut
- 12. Frequently Asked Questions
- Conclusion
Creating a dependable internal thread in thick metal is usually straightforward: drill the correct hole, cut the thread, and install the screw.
Thin sheet metal is less cooperative.
A panel may be too thin to provide enough thread engagement, the back of the assembly may be completely inaccessible, and welding a nut in place may introduce heat, distortion, fumes, or additional production steps. This is where the blind rivet nut earns its place in the fastener drawer.
A blind rivet nut is installed from one side of a workpiece and creates a mechanically secure internal thread. Once installed, it accepts a conventional machine screw or bolt, allowing the attached component to be removed and reinstalled without replacing the rivet nut.
This guide explains how a blind rivet nut works, how it differs from a blind rivet, which head and body styles are available, how to choose the correct material and grip range, how to install one properly, and how to avoid the problems that cause spinning, loose threads, damaged panels, and frustrated engineers.
1. What Is a Blind Rivet Nut?
A blind rivet nut is a tubular fastener with an internal machine thread. It is inserted into a prepared hole and permanently deformed so that it clamps itself into the workpiece.
The most important feature is one-sided installation. The operator does not need to hold a nut, washer, or tool behind the panel.
After setting, the blind rivet nut remains in the base material while a machine screw can be installed, removed, and replaced as required.
Blind rivet nuts are also commonly called:
· Rivet nuts
· Rivnuts
· Threaded rivet nuts
· Nutserts
· Threaded sleeves
“Rivnut” and “Nutsert” originated as product or brand terminology but are now frequently used informally for the general fastener category. In technical writing and product specifications, blind rivet nut or rivet nut is usually the clearest generic description.
Blind rivet nuts are particularly useful in:
· Thin sheet metal
· Hollow sections
· Closed profiles
· Tubes
· Electrical enclosures
· Equipment housings
· Plastic panels
· Composite components
· Structures that can be accessed from only one side
They create a thread without conventional tapping and without requiring a loose nut behind the workpiece. Official fastening references describe them as internally threaded tubular fasteners used to create load-bearing threads in thin materials and closed sections from one accessible side.
2. How Does a Blind Rivet Nut Work?
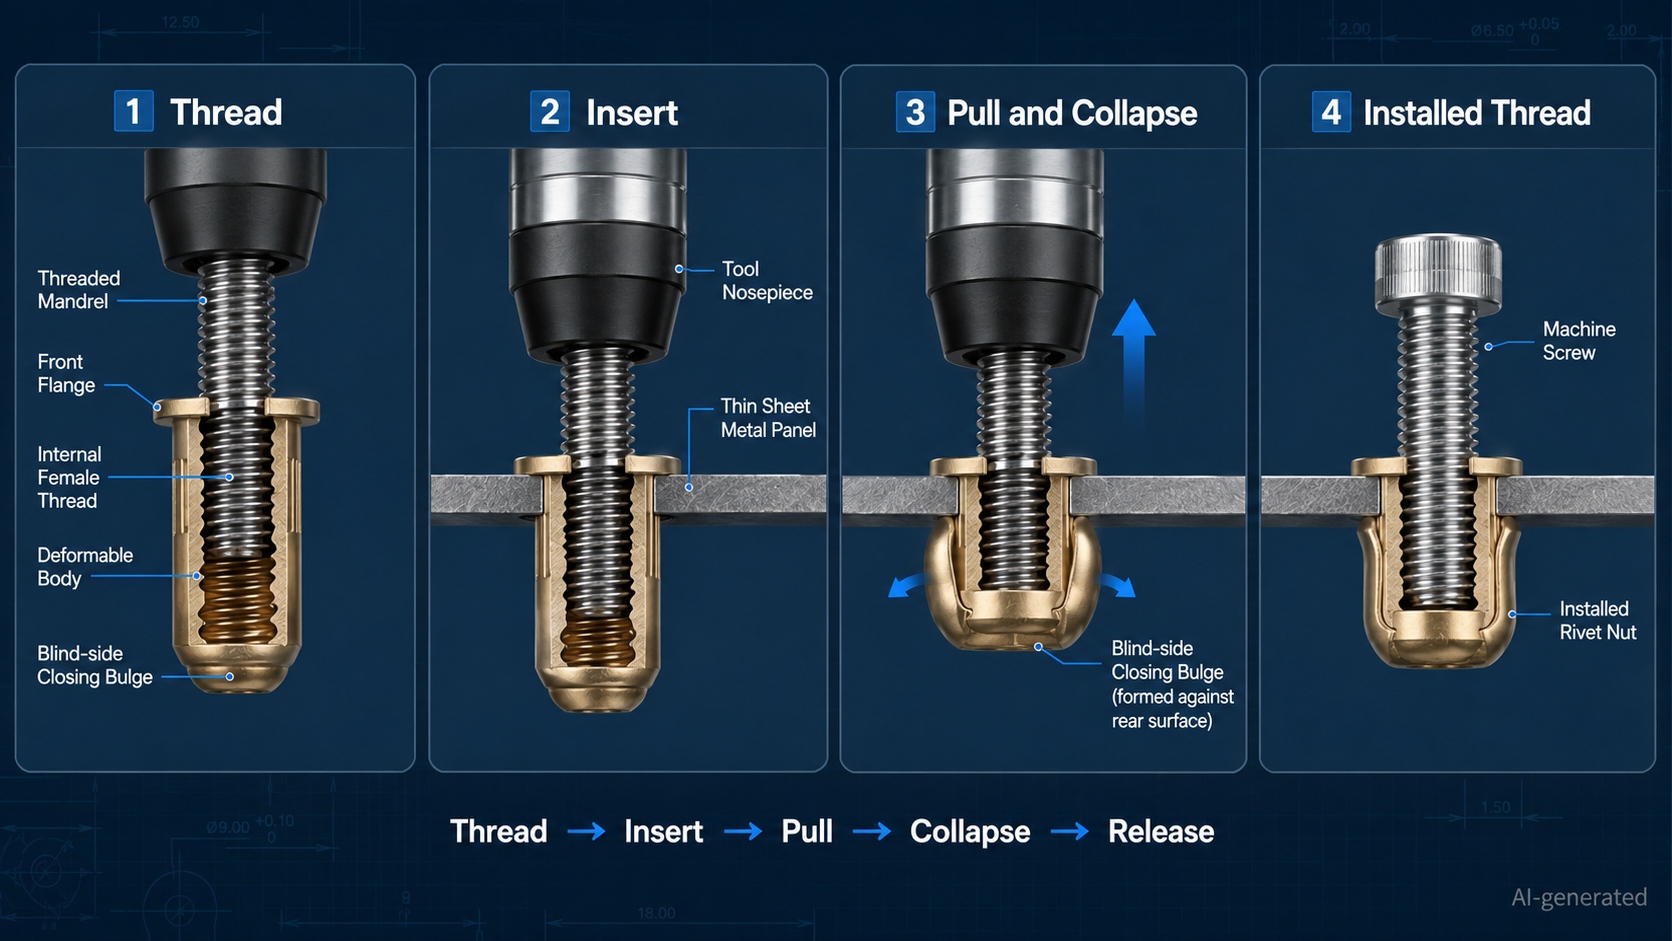
A blind rivet nut contains two functional areas:
Setting Head
The setting head remains on the visible side of the workpiece after installation.
It prevents the fastener from being pulled completely through the hole and distributes load across the front surface.
Deformable Body
The body passes through the prepared hole. During installation, part of this body collapses and forms a bulge or closing head behind the workpiece.
Inside the body is the machine thread that later accepts the screw.
The installation process can be summarized as:
Thread → Insert → Pull → Collapse → Release
First, the rivet nut is threaded onto the mandrel of a setting tool. The assembly is inserted into the prepared hole until the setting head contacts the workpiece.
The tool then pulls the threaded mandrel toward itself while holding the rivet nut head against the panel. This axial force shortens the deformable section of the rivet nut body.
As the body shortens, it expands behind the workpiece and forms a rear closing head. The panel becomes clamped between this newly formed bulge and the original setting head.
Unlike a standard blind rivet, the mandrel does not normally snap and remain in the joint. Once the rivet nut has been fully set, the tool mandrel is unscrewed from the installed thread.
The result is a permanent threaded insert that accepts a removable screw.
A correctly installed blind rivet nut should:
· Sit squarely in the hole
· Remain firmly clamped to the panel
· Resist turning during screw installation
· Accept the mating screw smoothly
· Show no serious cracking or distortion around the hole
· Provide enough thread engagement for the intended load
3. Blind Rivet Nut vs Blind Rivet
A blind rivet and a blind rivet nut can both be installed from one side, but they perform different jobs.
| Feature | Blind Rivet | Blind Rivet Nut |
| Main purpose | Permanently joins materials | Creates a reusable internal thread |
| Internal thread | No | Yes |
| Attached component removable | Normally no | Yes |
| Installation access | One side | One side |
| Setting method | Mandrel breaks during installation | Tool mandrel is unscrewed after setting |
| Typical use | Permanent sheet-metal joint | Removable panel, bracket, cover, or component |
A blind rivet is appropriate when two or more materials should remain permanently joined.
A blind rivet nut is appropriate when the base material needs a threaded mounting point for a screw or bolt.
For example, a blind rivet may be used to permanently attach a ventilation panel to a machine enclosure. A blind rivet nut may be installed in the same enclosure to secure a removable control module with machine screws.
For a broader explanation of conventional blind rivets, their materials, sizing, installation, and removal, see the complete Blind Rivet guide.
Blind Rivet Nut vs Weld Nut
A weld nut is permanently attached through welding. It can provide high strength, but it requires rear access, suitable welding equipment, surface preparation, and control of heat input.
A blind rivet nut requires no welding and creates no heat-affected zone. It is useful for painted panels, thin sheet, closed sections, mixed materials, and production environments where thermal distortion or welding fumes are undesirable.
Blind Rivet Nut vs Tapped Hole
A tapped hole is suitable when the base material is thick enough to provide adequate thread engagement.
Thin sheet may provide only one or two partial threads, which is rarely a reassuring foundation for a loaded machine screw. A blind rivet nut adds a full-length internal thread without increasing panel thickness.
Blind Rivet Nut vs Press-In Nut
Press-in and self-clinching nuts are normally installed using a press and depend on controlled displacement of the sheet material.
Blind rivet nuts are installed by axial pulling and are often more convenient for closed profiles, assembled structures, repair work, or locations where a press cannot reach.
4. Blind Rivet Nut Types
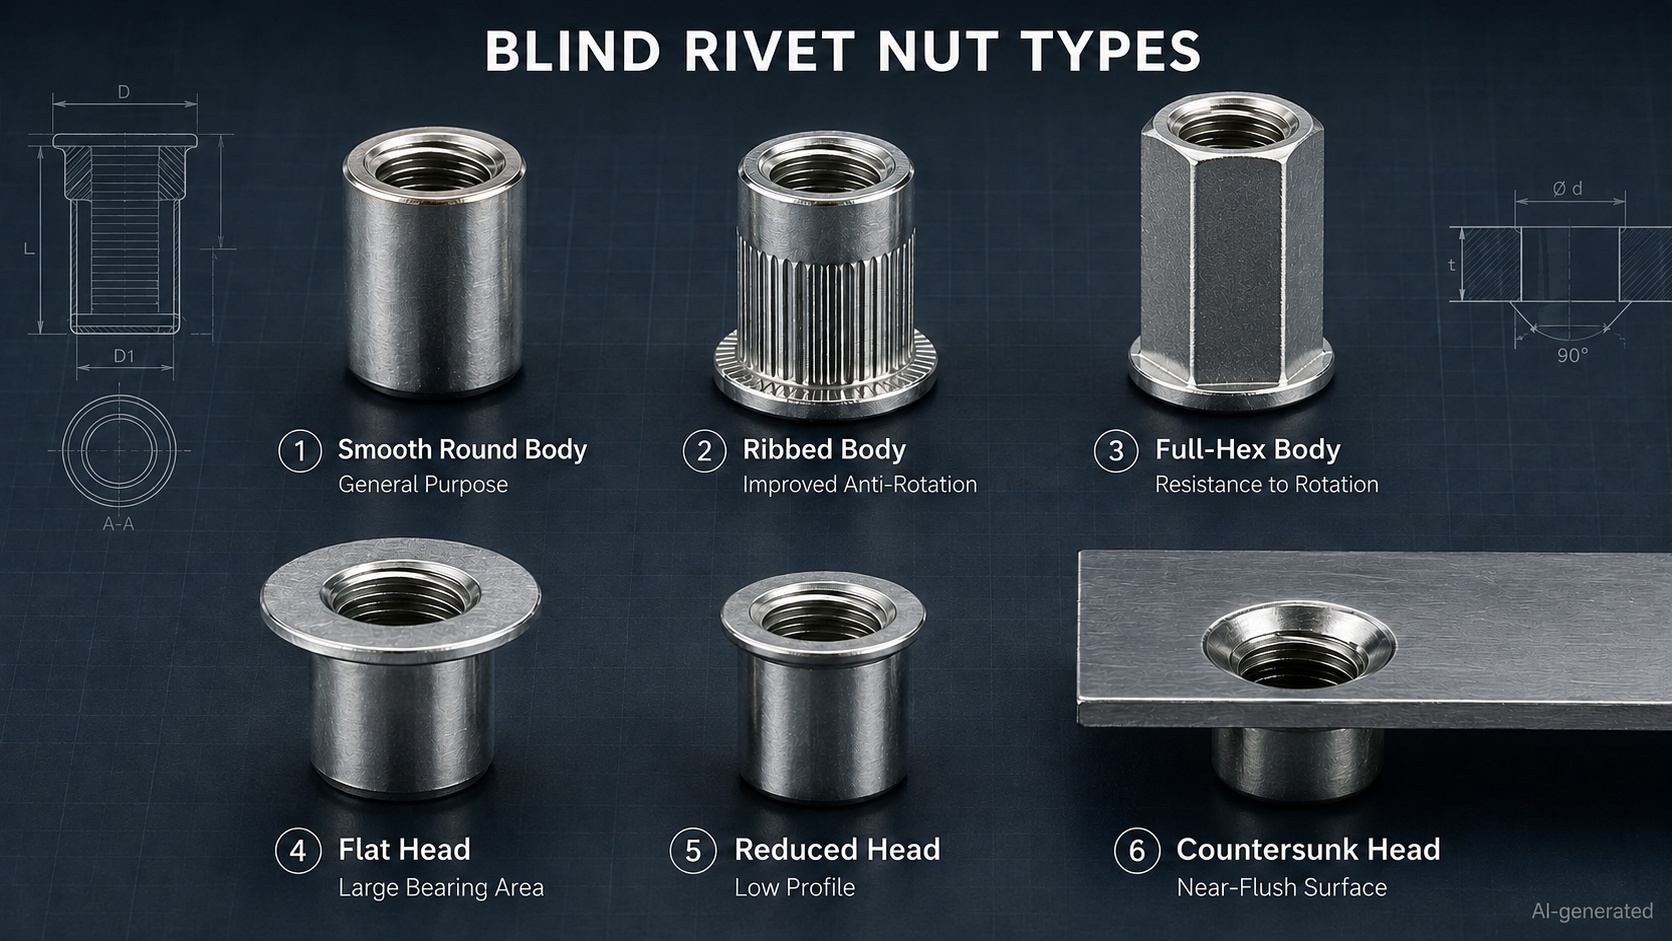
Blind rivet nuts can be classified by head style, body shape, body length, and end design.
These features affect installation height, resistance to rotation, grip range, sealing performance, and compatibility with the workpiece.
Flat or Dome Head
A flat or dome head provides a relatively large bearing surface on the visible side of the panel.
It is the common general-purpose choice and is suitable for:
· Thin sheet metal
· Equipment housings
· Electrical cabinets
· Machine guards
· General brackets
· Panels that do not require a flush surface
The larger contact area helps distribute load and reduces the risk of the head pulling into softer material.
Reduced Head
A reduced-head rivet nut has a smaller and thinner flange.
It creates a lower-profile installation and allows the attached component to sit closer to the workpiece.
Reduced-head designs are useful when:
· Surface projection must be minimized
· The mounted component needs a nearly flat support
· Appearance is important
· Space above the panel is limited
The smaller head provides less front-side bearing area, so the panel material and applied load must be considered carefully.
Countersunk Head
A countersunk blind rivet nut sits close to flush with the workpiece when installed in a correctly prepared countersunk hole.
It is suitable for:
· Smooth outer panels
· Sliding surfaces
· Covers with limited clearance
· Assemblies where a raised flange would interfere
The countersink must match the product specification. Simply forcing a countersunk rivet nut into an ordinary straight hole is not precision engineering; it is merely optimism with a setting tool.
Smooth Round Body
A smooth round body is easy to install in a conventional drilled hole.
It is widely used in general sheet-metal applications but normally provides less resistance to rotation than a ribbed, knurled, or polygonal design.
It is most suitable where:
· Screw torque is moderate
· The base material offers sufficient friction
· Hole diameter is tightly controlled
· The joint is not exposed to severe vibration
Ribbed or Knurled Body
A ribbed body has external serrations or knurls that engage with the surrounding material.
This improves resistance to rotation and is useful in:
· Sheet metal
· Aluminum panels
· Equipment housings
· Applications with repeated screw removal
· Joints exposed to moderate vibration
Ribbing does not compensate for an oversized hole or an under-set rivet nut, but it can improve torque resistance when the rest of the joint is correct.
Partial-Hex and Full-Hex Body
A hexagonal rivet nut is installed into a matching hexagonal hole.
Because the body cannot rotate freely inside the shaped hole, hex designs provide much better anti-rotation performance than a smooth round body.
They are useful for:
· Higher tightening torque
· Frequent component removal
· Vibration-prone machinery
· Industrial enclosures
· Production assemblies requiring repeatable torque resistance
The disadvantage is hole preparation. A normal twist drill produces a round hole, not a hexagon. Hex-body rivet nuts usually require punching, laser cutting, machining, or another controlled process.
Official guidance commonly groups blind rivet nuts into round, knurled, and polygonal body styles, with polygonal bodies providing stronger mechanical resistance to rotation.
Open-End and Closed-End Designs
An open-end blind rivet nut allows the mating screw to pass through the end of the fastener when sufficient clearance is available.
A closed-end rivet nut seals the threaded body at the blind end. It can help protect the screw thread and may improve resistance to moisture, dirt, or fluid entry.
A closed end should not automatically be interpreted as a fully waterproof joint. Sealing still depends on the head interface, hole condition, coatings, and the complete assembly design.
5. Blind Rivet Nut Materials
The most common blind rivet nut materials are aluminum, carbon steel, and stainless steel.
Aluminum Blind Rivet Nut
Aluminum rivet nuts are lightweight and generally require less setting force than steel or stainless steel.
They are suitable for:
· Aluminum sheet
· Lightweight enclosures
· Electronic equipment
· Plastic or composite panels
· Applications where weight matters
· Lower- to medium-load connections
Their lower setting force can help reduce deformation in thin or soft panels.
However, aluminum threads normally provide lower strength and wear resistance than comparable steel or stainless steel threads. Repeated tightening at excessive torque can damage the internal thread.
Carbon Steel Blind Rivet Nut
Carbon steel rivet nuts provide a practical balance of strength, availability, and cost.
They are widely used in:
· Machinery
· Steel enclosures
· Automotive components
· Control cabinets
· Industrial brackets
· Equipment frames
Galvanized or zinc-plated finishes are commonly used to improve corrosion resistance.
The finish should be evaluated against the real environment. A basic galvanized coating may be entirely suitable inside a dry control cabinet but less convincing beside salt spray, condensation, and outdoor weather.
Stainless Steel Blind Rivet Nut
Stainless steel rivet nuts offer high strength and good corrosion resistance.
Typical applications include:
· Outdoor equipment
· Food-processing machinery
· Washdown environments
· Laboratory equipment
· Stainless steel panels
· Humid or chemically exposed assemblies
Stainless steel normally requires greater setting force, so the tool must be rated for the chosen thread size and material.
Material Compatibility
The rivet nut material should be selected together with the workpiece material, mating screw, coating, and operating environment.
Important considerations include:
· Galvanic corrosion
· Required thread strength
· Panel hardness
· Installation force
· Temperature
· Humidity
· Chemical exposure
· Expected tightening cycles
Using stainless steel hardware in an aluminum panel, for example, may require isolation or corrosion protection in wet environments.
The most expensive material is not automatically the best one. The correct material is the one that satisfies the mechanical and environmental requirements without creating a new problem elsewhere.
6. Thread Size, Hole Size and Grip Range
Selecting a blind rivet nut requires several dimensions to be checked together.
Internal Thread Size
The internal thread must match the mating machine screw.
Common metric sizes include:
· M3
· M4
· M5
· M6
· M8
· M10
· M12
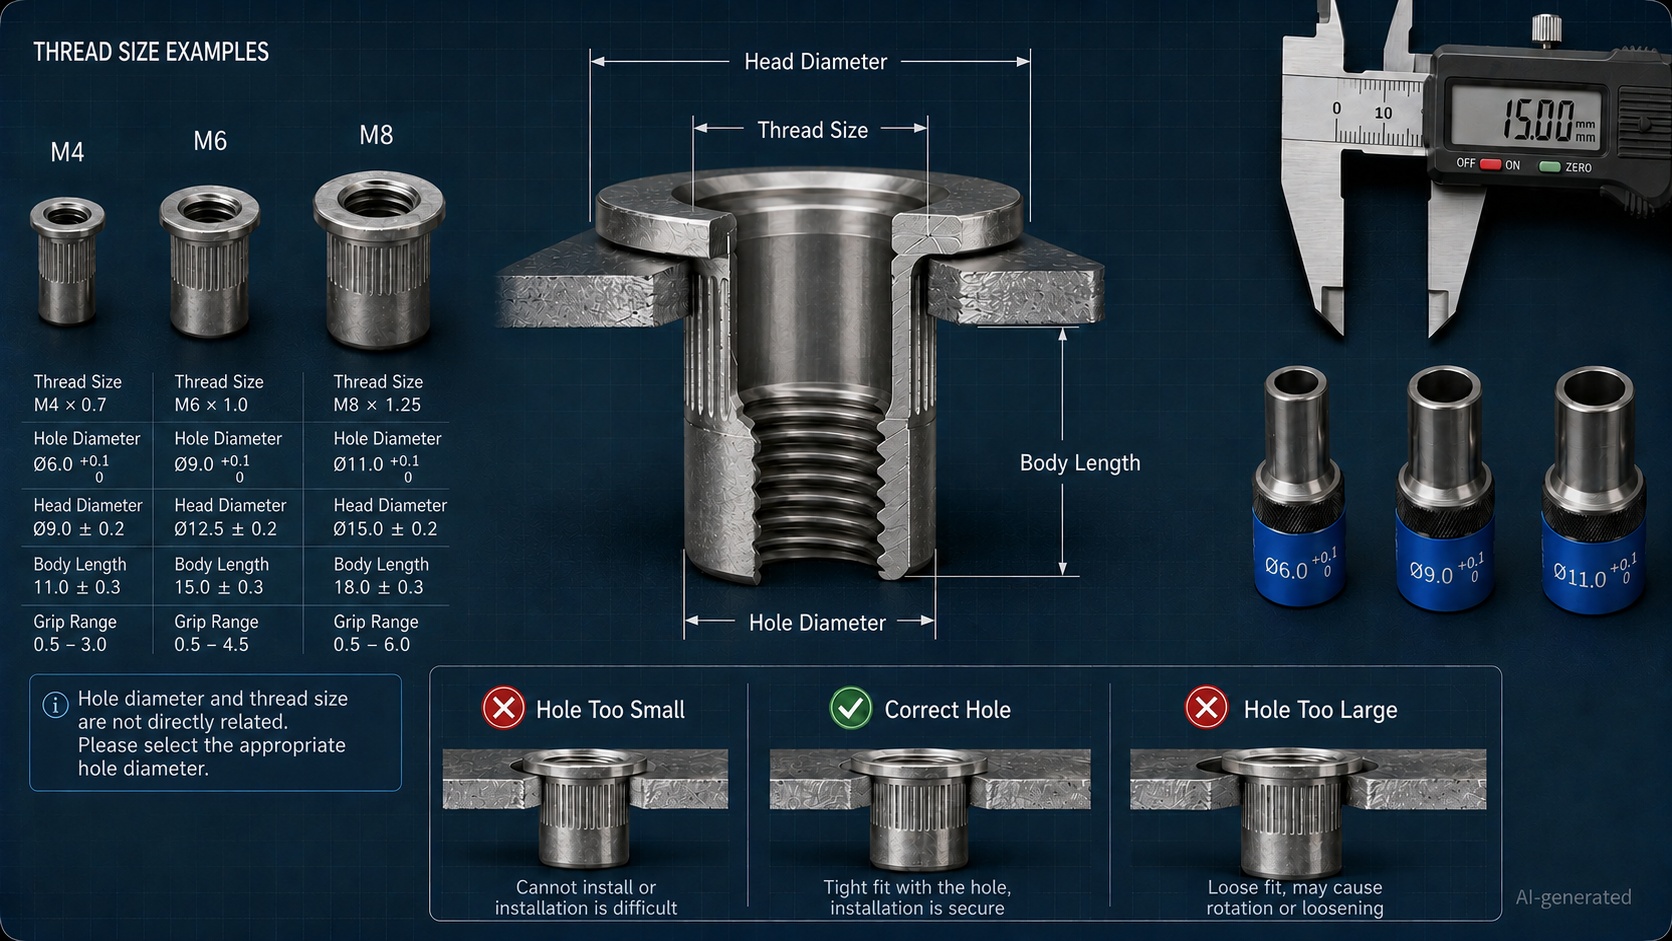
The thread size does not directly tell you the required mounting-hole diameter. An M6 rivet nut, for example, needs a body large enough to contain the M6 thread, so its installation hole will be larger than 6 mm.
Always use the product drawing or specification table.
Hole Diameter
The hole must be large enough for insertion but small enough to support the body and prevent rotation.
A hole that is too small may:
· Damage the rivet nut coating
· Prevent full insertion
· Distort the body
· Scratch or crack the workpiece
A hole that is too large may:
· Allow the rivet nut to spin
· Reduce anti-rotation performance
· Produce off-center setting
· Lower pull-out strength
· Create visible gaps under the head
General manufacturer guidance may use a small clearance over the rivet nut body diameter, but the exact hole specification varies with product geometry. It should always come from the technical drawing rather than a universal allowance.
Grip Range
Grip range is the material-thickness range that the rivet nut can clamp correctly.
The rivet nut must be selected according to the thickness of the panel in which it is being installed.
If the material is thinner than the specified range, the body may not clamp firmly.
If the material is thicker than the range, the deformable section may be unable to form a complete closing head.
Grip range should not be confused with total body length. Two rivet nuts with the same thread size may be designed for different panel thicknesses.
Head Diameter and Projection
The head diameter affects load distribution on the front side.
The head height affects how far the rivet nut projects above the panel and whether the attached component can sit flat.
Body Shape and Hole Shape
A round body requires a round hole.
A full-hex or partial-hex body requires a correctly dimensioned polygonal hole.
Do not substitute one for the other simply because the thread size matches.
As a current JLCMC example, the platform lists a pull-through ribbed, dome-head blind rivet nut in carbon steel and SUS304, with galvanized or uncoated finish options and female-thread diameters from M3 through M12. These product filters illustrate why thread size, material, finish, and body style should be reviewed together rather than selected independently.
7. How to Choose a Blind Rivet Nut
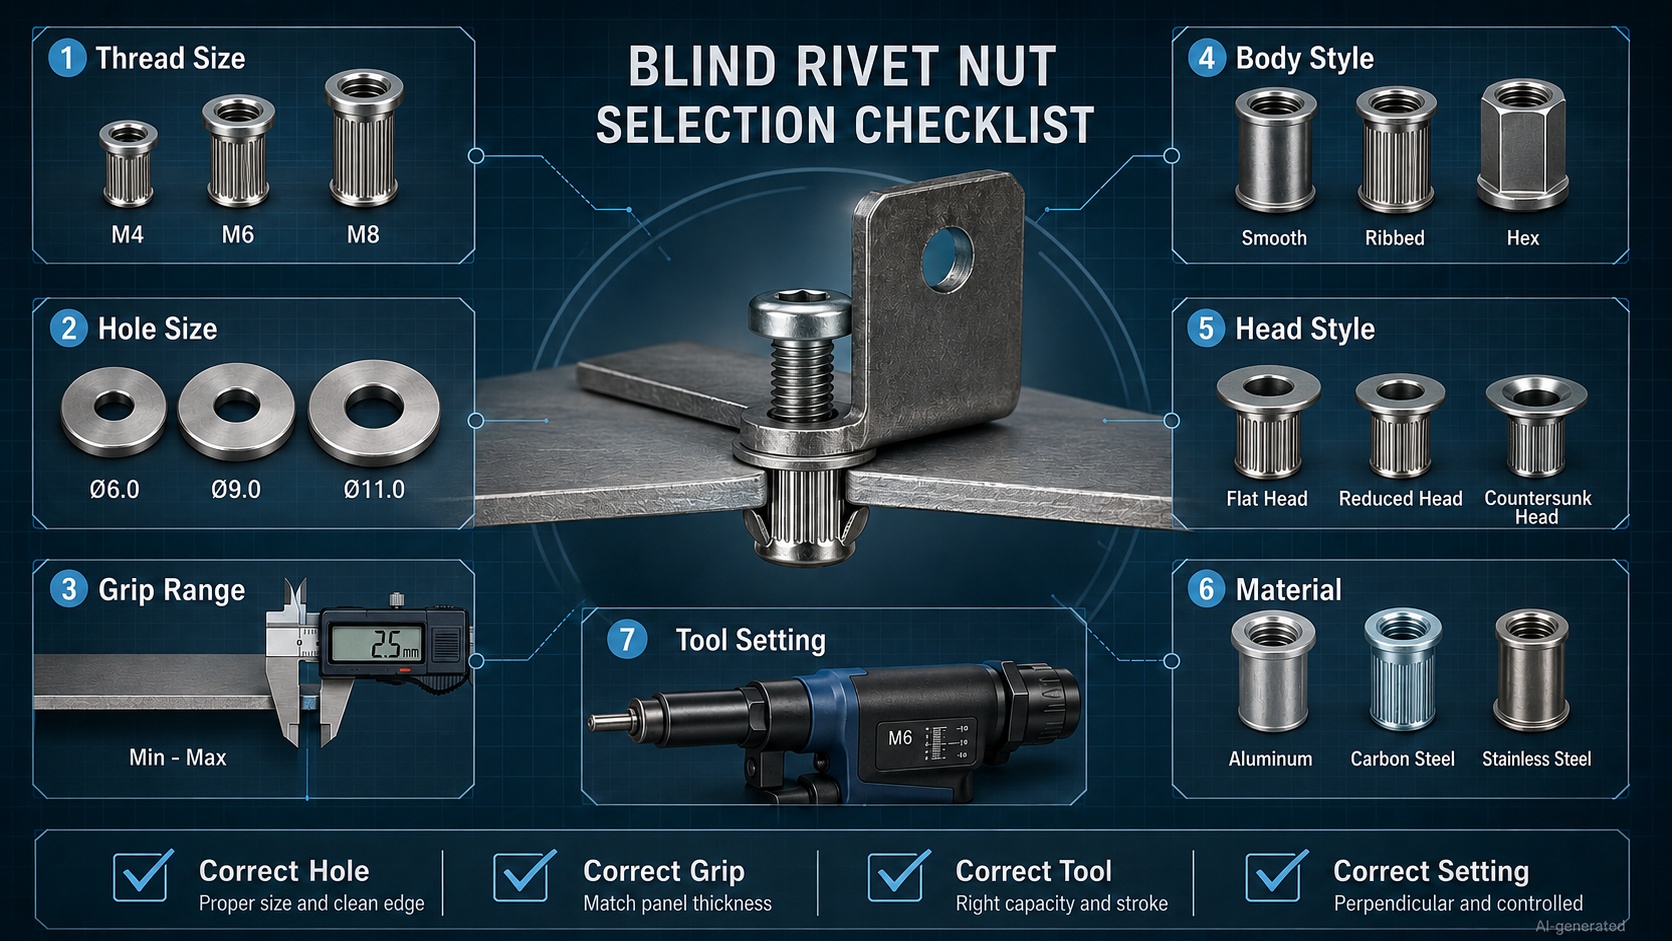
A reliable selection process can be organized into eight questions.
1. What Is the Base Material?
Determine whether the rivet nut will be installed in:
· Carbon steel
· Stainless steel
· Aluminum
· Plastic
· Composite material
· Magnesium
· A coated or painted panel
The base material affects body style, head size, setting force, corrosion risk, and allowable panel deformation.
2. How Thick Is the Panel?
Measure the actual thickness at the installation location.
Do not rely only on nominal sheet thickness if the panel includes:
· Coating
· Lamination
· Local reinforcement
· Multiple layers
· Molded ribs
· Surface treatment
Select a grip range that includes the real thickness.
3. What Thread Size Is Required?
Choose the thread according to the mating screw and the mechanical load.
A larger thread may provide greater capacity, but it also requires a larger rivet nut body and hole.
4. How Much Tightening Torque Will Be Applied?
Higher screw torque creates a greater risk of rivet nut rotation.
For higher torque, consider:
· Ribbed bodies
· Knurled bodies
· Partial-hex bodies
· Full-hex bodies
· Controlled tightening tools
5. Will the Screw Be Removed Frequently?
Frequent assembly and disassembly increase wear on the internal thread and place repeated torque on the rivet nut body.
Choose a material and body style suitable for the expected maintenance cycle.
6. What Loads Will the Joint Experience?
Consider:
· Pull-out load
· Push-out load
· Torque-out load
· Shear
· Vibration
· Impact
· Fatigue
The machine screw, rivet nut, panel, and attached component form one joint. Evaluating only the screw strength tells only part of the story.
7. What Environment Will the Assembly Face?
Check for:
· Moisture
· Salt
· Chemicals
· Outdoor exposure
· Temperature changes
· Washdown
· Electrical conductivity requirements
8. Which Installation Tool Is Available?
The tool must match:
· Thread size
· Rivet nut material
· Required setting force
· Setting stroke
· Mandrel thread
· Production volume
Manual tools are appropriate for smaller quantities and lighter products. Battery and pneumatic-hydraulic tools are more suitable for repetitive work, larger threads, or stronger materials. Fully automated systems may be used in high-volume production.
8. How to Install a Blind Rivet Nut
Correct installation depends on preparation, tool adjustment, and alignment.
Tools Required
Prepare:
· Blind rivet nuts
· Compatible setting tool
· Correct threaded mandrel
· Matching nosepiece
· Drill or hole-making equipment
· Suitable drill bit
· Deburring tool
· Measuring tools
· Test panel
· Eye protection
Step 1: Confirm the Specification
Before drilling, verify:
· Thread size
· Body diameter
· Recommended hole size
· Grip range
· Head style
· Body shape
· Rivet nut material
· Tool capability
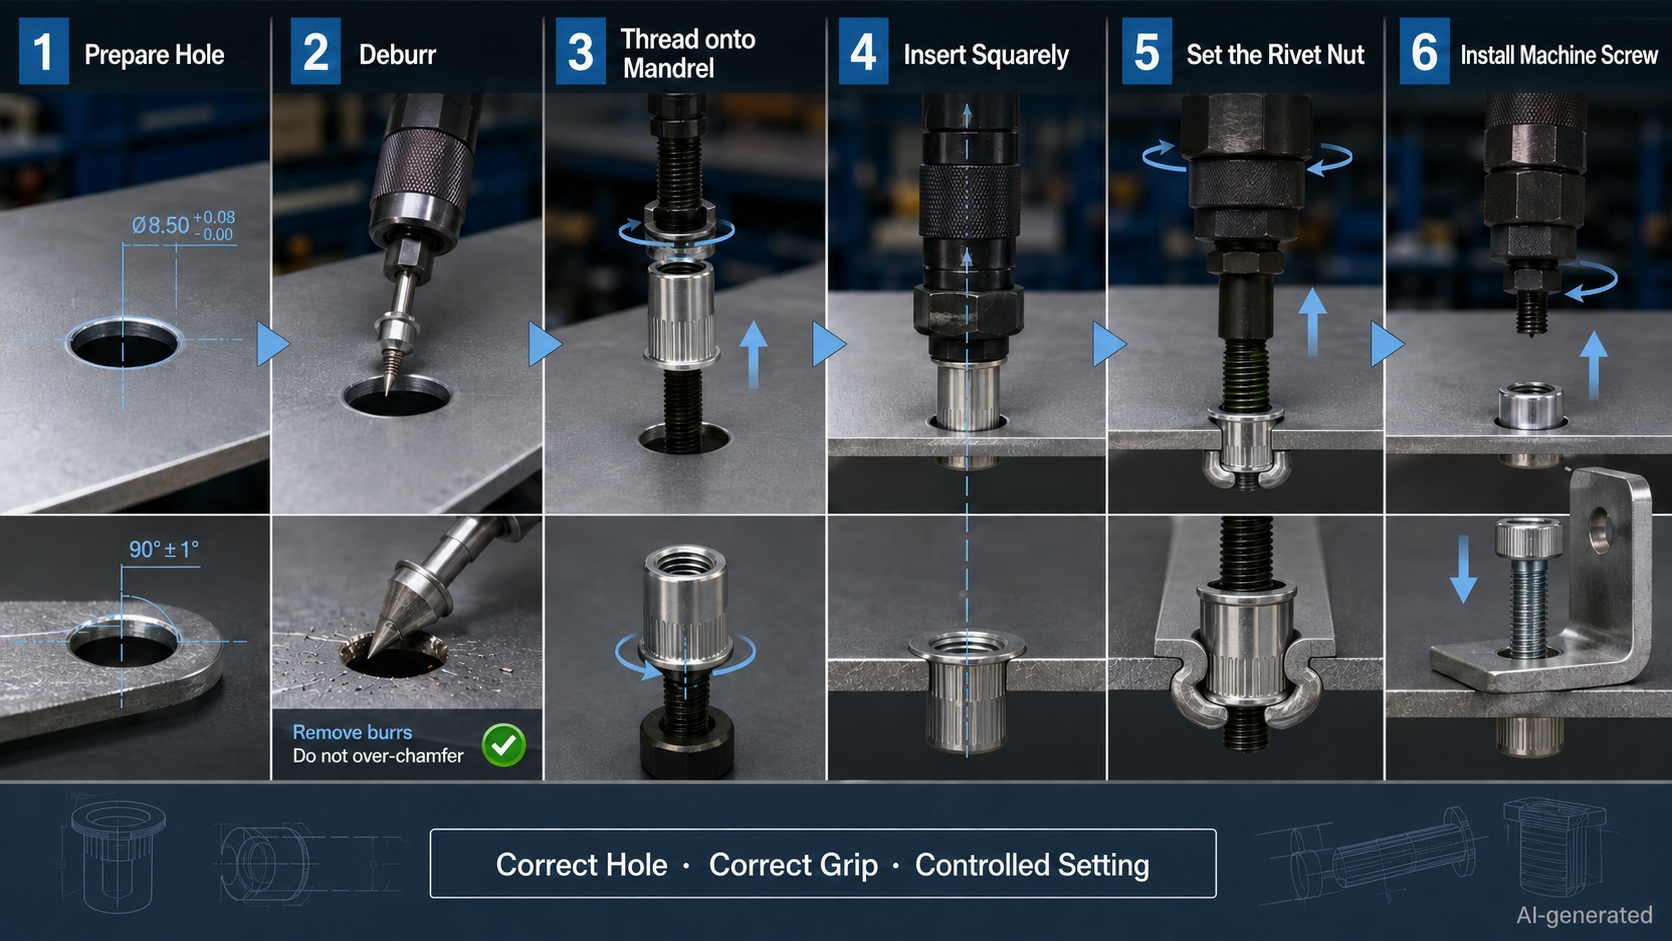
Step 2: Prepare the Hole
Drill, punch, laser-cut, or machine the correct hole.
The hole should be:
· Correctly sized
· Round or polygonal as specified
· Perpendicular to the surface
· Free from excessive taper
· Free from cracks
· Properly positioned from edges and bends
Remove burrs without excessively chamfering the hole unless a countersunk product requires it.
Step 3: Install the Correct Tool Mandrel
Fit the mandrel and nosepiece that match the internal thread of the rivet nut.
An M5 rivet nut requires an M5 mandrel. A close approximation is not close enough.
Step 4: Thread the Rivet Nut Onto the Tool
Screw the rivet nut fully and straight onto the mandrel.
The head should seat correctly against the tool nosepiece. Cross-threading at this stage can damage both the rivet nut and the setting mandrel.
Step 5: Insert the Rivet Nut
Insert the rivet nut body into the prepared hole until the setting head contacts the workpiece.
Hold the tool perpendicular to the panel.
An angled tool can produce an uneven closing head, distorted thread, poor head seating, or a rivet nut that leans like it has had a very long shift.
Step 6: Set the Rivet Nut
Operate the tool according to its instructions.
The mandrel pulls the threaded section toward the tool, compressing the deformable body behind the panel.
Tool control may be based on:
· Stroke
· Setting force
· Pressure
· A combination of force and stroke
Excessive setting can damage the thread, crush the body, distort the panel, or break the mandrel.
Insufficient setting can leave the rivet nut loose and likely to rotate.
Step 7: Unscrew the Mandrel
After setting, reverse or unscrew the tool mandrel from the installed rivet nut.
Do not force the tool sideways while disengaging it.
Step 8: Inspect the Installation
Check that:
· The head sits flat
· The body is not tilted
· The rivet nut does not rotate
· The panel is not cracked
· The thread is clean
· The screw enters smoothly
· The closing head is correctly formed, if visible
For production work, test representative installations for torque-out, pull-out, and thread performance before full-scale assembly.
The standard installation sequence—prepare the hole, thread the nut onto the tool, insert it, actuate the tool, and unscrew the mandrel—is also reflected in official blind rivet nut installation guidance.
9. Applications in Mechatronic and Sheet-Metal Assemblies
Blind rivet nuts are especially useful in mechatronic equipment because these systems often combine thin panels with removable electrical and mechanical components.
Electrical Enclosures
Rivet nuts can provide threaded mounting points for:
· Control panels
· Cable glands
· DIN rail brackets
· Fans
· Filters
· Terminal covers
· Grounding components
· Internal equipment plates
They are useful where the enclosure is already folded and the rear of the mounting surface cannot be reached.
Machine Guards and Removable Covers
Machine guards and service covers need secure fastening but may also require periodic removal.
A conventional blind rivet would need to be drilled out during every maintenance cycle. A blind rivet nut remains in the frame while the screw is removed normally.
Sensor Brackets
Sensors often require alignment, replacement, or adjustment.
Rivet nuts can secure:
· Photoelectric sensor brackets
· Proximity sensor mounts
· Limit-switch brackets
· Cable supports
· Inspection-camera mounts
Their reusable thread allows the bracket to be removed without replacing the base fastener.
Fans and Cooling Components
Cooling fans, filters, ducts, and protective grilles may need cleaning or replacement.
Blind rivet nuts create serviceable mounting points in sheet-metal housings without leaving loose nuts inside the equipment.
Aluminum Extrusion and Framed Equipment
Blind rivet nuts can be used in attached sheet-metal panels, hollow structural members, and access covers around aluminum extrusion frames.
They should not automatically replace purpose-designed T-slot nuts inside an extrusion channel. The choice depends on where the thread is required and how the load enters the structure.
Robotics and Automation Equipment
Typical uses include:
· Controller covers
· Cable tray brackets
· Motor guards
· End-effector covers
· Sensor plates
· Pneumatic valve panels
· Human-machine interface housings
In all these applications, serviceability is the key advantage: the screw comes out, but the thread stays put.
10. Common Blind Rivet Nut Problems
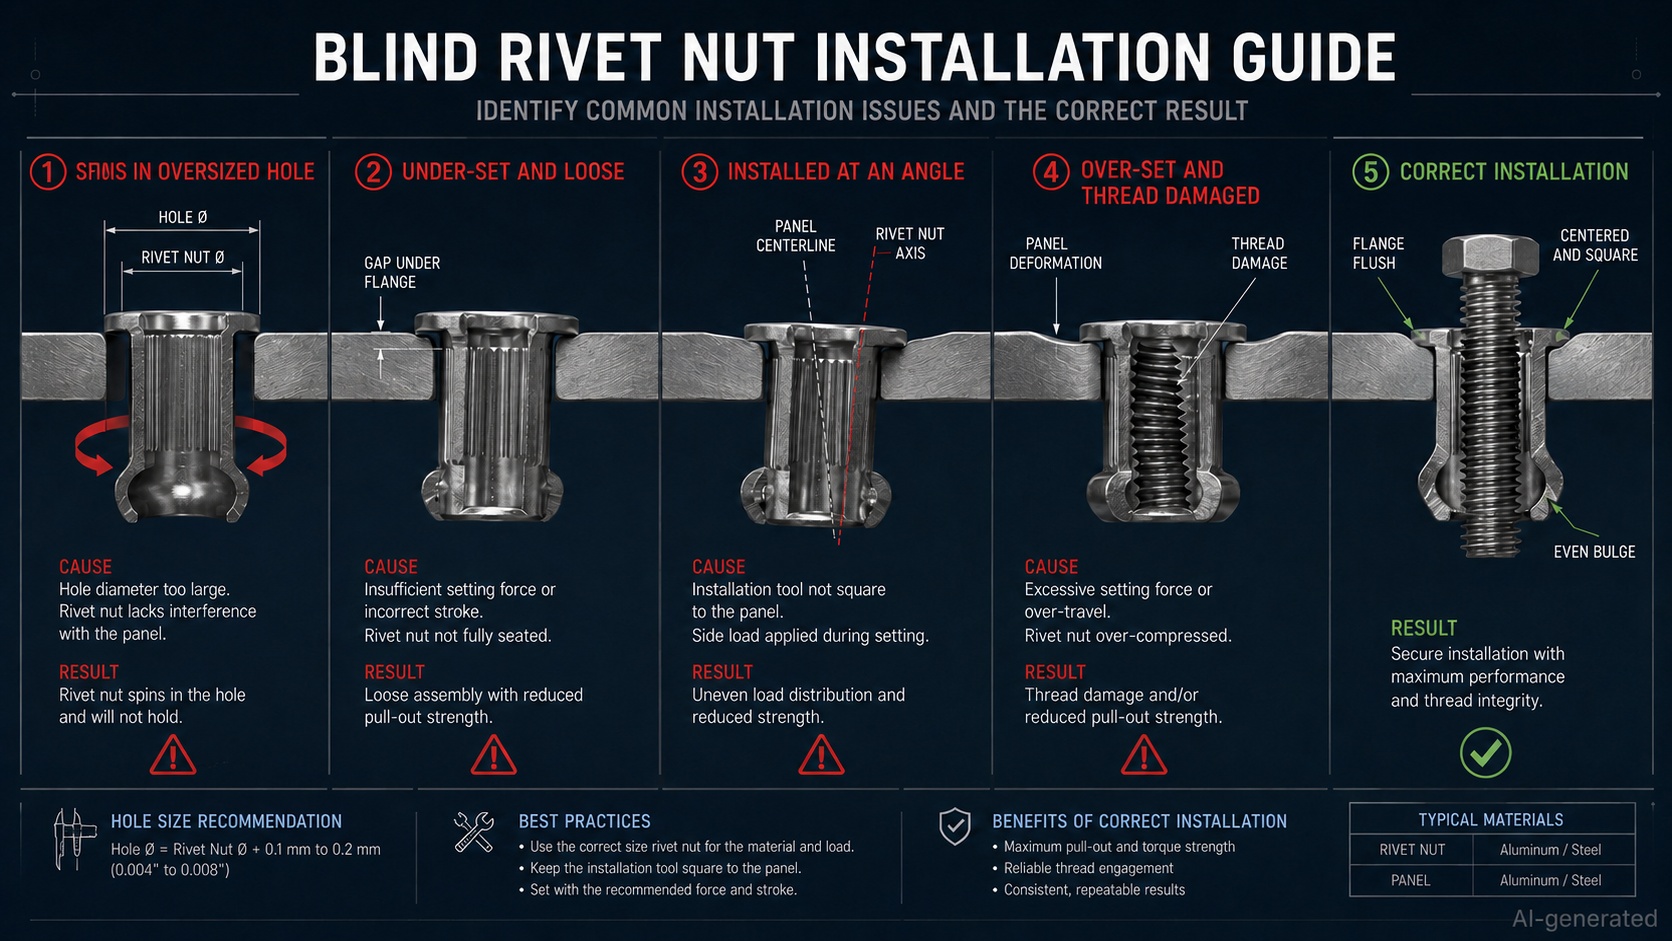
The Rivet Nut Spins
A spinning rivet nut is one of the most common failures.
Possible causes include:
· Hole too large
· Insufficient setting force
· Incorrect grip range
· Smooth body used at high torque
· Soft panel deformation
· Poor body-to-hole contact
· Screw overtightening
Possible solutions include a correctly sized hole, improved setting control, a ribbed body, or a hex-body design.
The Rivet Nut Is Loose
A loose installation may result from:
· Under-setting
· Rivet nut too long for the panel
· Incorrect grip range
· Panel thickness below specification
· Tool stroke set too short
· Deformed or oversized hole
Do not attempt to solve every loose installation by pulling harder. Excessive force may simply damage the thread or panel.
The Rivet Nut Sets at an Angle
Likely causes include:
· Tool held off-axis
· Hole drilled at an angle
· Burrs beneath the head
· Uneven panel surface
· Rivet nut not fully inserted before setting
The Thread Is Damaged
Possible causes include:
· Wrong mandrel thread
· Cross-threading
· Excessive setting force
· Damaged installation tool
· Misaligned screw
· Screw torque above the allowable level
The Panel Deforms
Thin panels may dish, buckle, or crack if:
· Setting force is excessive
· Head contact area is too small
· Rivet nut is too large
· Hole is too close to an edge or bend
· Panel support is inadequate
· Material is too brittle
The Screw Cannot Be Removed
Possible reasons include:
· Thread galling
· Corrosion
· Cross-threading
· Excessive tightening torque
· Rivet nut rotation
· Contaminated thread
For stainless steel threads, appropriate lubrication and controlled torque may help reduce galling risk where permitted by the application.
Official troubleshooting guidance similarly identifies oversized holes, smooth body selection, poor tool alignment, and incorrect setting parameters as common causes of spinning or crooked installation.
11. Removing a Blind Rivet Nut
A blind rivet nut is designed to remain permanently in the workpiece.
Removal is possible, but it normally destroys the fastener and carries some risk of damaging the panel.
Possible removal methods include:
· Carefully drilling away the head
· Machining the body
· Using a purpose-designed removal tool
· Cutting the collapsed rear section where accessible
The correct method depends on the rivet nut material, panel thickness, access, and surrounding components.
After removal, inspect the hole for:
· Enlargement
· Cracking
· Ovality
· Burrs
· Coating damage
· Corrosion
· Panel deformation
A removed blind rivet nut should not be reused. If the hole remains within specification, install a new fastener. If the hole has enlarged, the joint may need repair, a different fastener size, or a redesigned mounting location.
Removal should be carried out particularly carefully when the panel is functionally critical, because drilling can damage both the workpiece and surrounding components.
12. Frequently Asked Questions
Is a Blind Rivet Nut the Same as a Rivnut?
In common usage, yes. Rivnut is widely used as an informal name for a blind rivet nut.
Can a Blind Rivet Nut Be Installed From One Side?
Yes. One-sided installation is its defining advantage.
Can a Blind Rivet Nut Be Used in Plastic?
Yes, provided the body style, grip range, head size, and setting force are suitable for the plastic.
A large head or load-spreading design may be necessary to prevent cracking or pull-through.
Can I Install a Rivet Nut Without a Special Tool?
Improvised bolt-and-nut methods are sometimes used for occasional repairs, but they provide limited control over force, stroke, alignment, and thread condition.
A proper blind rivet nut tool is strongly preferred for repeatable installation.
What Is the Difference Between Grip Range and Thread Size?
Thread size identifies the mating screw, such as M5 or M6.
Grip range identifies the panel-thickness range that the rivet nut can clamp.
They are separate selection parameters.
Why Does My Rivet Nut Keep Spinning?
The most likely causes are an oversized hole, insufficient setting, an unsuitable smooth body, or excessive screw torque.
Are Hex Rivet Nuts Better Than Round Rivet Nuts?
Hex-body rivet nuts generally provide better resistance to rotation, but they require a matching hexagonal hole and more controlled manufacturing.
They are not automatically necessary for every application.
Can a Blind Rivet Nut Join Two Panels Together?
Yes, some designs can clamp multiple material layers while also creating a thread.
However, the full material stack must fall within the specified grip range, and the joint must be evaluated for slip and load transfer.
Are Blind Rivet Nuts Waterproof?
Some closed-end or sealed products can improve water or gas resistance, but complete sealing depends on the entire joint, not only the rivet nut.
Can Blind Rivet Nuts Be Reused?
The installed rivet nut remains in the workpiece and can accept a screw repeatedly.
If the rivet nut itself is removed, it should be replaced rather than reused.
Conclusion
A blind rivet nut solves a specific but very common engineering problem: how to create a durable, reusable internal thread in thin material when the rear side cannot be reached.
The fastener is simple in principle, but dependable performance requires the correct combination of thread size, grip range, hole diameter, head style, body shape, material, tool, and setting parameters.
A smooth round rivet nut may be suitable for a lightly loaded enclosure. A ribbed body may provide better torque resistance in general machinery. A hex-body design may be preferable where screws are removed frequently or tightened more firmly. Aluminum can reduce weight and setting force, while carbon steel and stainless steel serve applications requiring greater thread strength or corrosion resistance.
The installation should finish with the head sitting flat, the body securely clamped, and the internal thread aligned and undamaged. When those conditions are met, a thin panel can provide a reliable threaded mounting point without welding, tapping, or access to the rear.
Engineers and purchasing teams can review blind rivet nut materials, thread diameters, finishes, specifications, and related fastening products through the JLCMC Rivets category. The best choice is not simply the rivet nut that fits the screw—it is the one that fits the panel, the tool, the load, the environment, and the maintenance plan.
Popular Articles
Keep Learning
Threaded Standoff vs Spacer: What Is the Difference?
Key Takeaways Threaded standoffs provide both spacing and threaded attachment points, making them ideal for modular assemblies and PCBs. Spacers are unthreaded sleeves that work with through-bolts to maintain gaps in clamped assemblies, offering a simpler and more economical solution. The right choice depends on the load path, assembly sequence, material, and service environment - not just appearance or catalog naming. A threaded standoff and a spacer can look almost identical on a workbench. Both cre......
How to Choose a Threaded Standoff for PCB and Mechatronic Assemblies
Key Takeaways Select the right configuration: Choose male-female, female-female, or male-male thread configurations based on the two mating interfaces and the intended assembly sequence. Treat height as a tolerance stack: Standoff body length must satisfy clearance, electrical, thermal, and connector requirements across the full tolerance range, not just the nominal dimension. Verify thread engagement: Check male thread length against tapped-hole depth and upper screw length against usable female thre......
Threaded Standoff Guide: Types, Sizes, Materials and Applications
Key Takeaways Thread configuration first: Choose female-female, male-female or male-male based on how both sides of the assembly attach — thread config is the most practical way to classify a threaded standoff. Body length is the critical dimension: Standoff length refers to the distance between supporting faces, not total physical length. Reading the wrong length causes incorrect mounting height or screw bottoming. Material affects more than strength: Brass, stainless steel, carbon steel, aluminum an......
Ball Nose End Mill Stepover: Scallop Height and Effective Diameter
Key Takeaways Geometric Control: Stepover directly controls geometric scallop height, but it does not automatically guarantee a measured Ra value. Cusp Height Formula: For a ball radius $R$ and pass spacing $s$ on a flat surface, the ideal cusp height is $h = R - \sqrt{R^2 - \frac{s^2}{4}}$. Tool Radius Advantage: A larger ball can use wider spacing for the same ideal cusp, provided it can reach the required geometry without gouging. Effective Diameter: The active cutting diameter near the tool tip ca......
Manual SMT Stencil Printer Sizing: Print Area, PCB Support and Frame Fit
Key Takeaways Different dimensions: Worktable size, effective print area, board envelope, and stencil frame size are different dimensions. Check the full pattern: Check the whole aperture pattern in its intended orientation, including clearance for the printing stroke. Thickness is not enough: A compatible board thickness does not prove that a populated underside or a support fixture will fit. Support and contact: Stable support and close stencil-to-board contact are necessary for a repeatable printin......
Blind Rivet Guide: Types, Sizes, Uses, Installation and Removal
A blind rivet may be small, but choosing one correctly involves more than matching a rivet to the nearest drill bit. The diameter, grip range, hole size, body material, mandrel material, head style and installation tool all influence the finished joint. A rivet that looks perfectly acceptable before installation can still spin, loosen, pull through the sheet or form incorrectly on the blind side if one of these factors is overlooked. Blind rivets are widely used in sheet-metal fabrication, electrical ......